
Securing Web APIs with Azure AD: Enabling Local Development

Posts in this series:
- A Case Study
- Designing Authentication Schemes
- Authorizing Client Applications
- Building the Server
- Enabling Local Development
- Connecting External Clients
- Connecting Azure Clients
In the last post, we looked at creating the server application and corresponding Azure resources to secure it. If we try to test our application locally, we'll quickly run into issues - our API requires a valid JWT with appropriate roles. In order to properly exercise our API, we could simply turn authentication/authorization off for local development (or testing in a dev environment). But that's no fun!
To exercise our API, I tend to use the Swagger UI for convenience. We could use other tools like Postman, but Swagger gives a great local IDE experience. Configuring Swashbuckle to add authentication is fairly straightforward, but we will need to pick an OAuth flow to get it to work properly. However, we won't be able to use the same flow as our client applications (Client Credentials).
By design, Azure AD will not issue JWTs for the Client Credentials flow from requests originating in a browser. Once Azure AD sees the referer HTTP header, it blocks Client Credentials flow, since this would require us to use a client secret in our browser.
So instead, we'll have to use a flow appropriate for browsers - Auth Code. With the Auth Code flow, we ask the identity provider to issue a token for requested scopes. However, we don't have scopes, we have roles, so what will we be asking the server for?
It turns out Azure AD needs some scope defined in order for us to get a token that includes the roles claim (even if nothing in our app cares about that scope). It's a bit odd, but this scenario is just for local development, exercising the API in a way that won't exactly match production (calling from a browser instead of an app).
First up, let's create the appropriate Azure resources.
Creating the Azure Resources
Currently, our App Registration isn't configured to be able to be called from a browser, or include any scopes. For just our Dev resources, we'll want to add a scope definition and ensure we can be granted these scopes.
First, let's create an ID for our local dev scope (we'll need to reference it later):
var localDevScopeUuid
    = new Pulumi.Random.RandomUuid($"{prefix}-{AppName}-local-dev-scope-id");
Next, we'll modify our App Registration to add this LocalDev scope:
Api = new AzureAD.Inputs.ApplicationApiArgs
{
    RequestedAccessTokenVersion = 2,
    Oauth2PermissionScopes =
    {
        new AzureAD.Inputs.ApplicationApiOauth2PermissionScopeArgs
        {
            AdminConsentDescription = "Local development",
            AdminConsentDisplayName = "LocalDev",
            Id = localDevScopeUuid.Result,
            Enabled = true,
            Value = "LocalDev",
            Type = "User"
        }
    }
},
Since this scope is meant for users and not only admins (as our dev teams are usually not admins), we set the Type as User. The Value of the scope is what we'll be referring to later when we request a scope in the OAuth flow.
We'll also need to modify our App Registration to include the OAuth redirect URLs:
SinglePageApplication = new AzureAD.Inputs.ApplicationSinglePageApplicationArgs
{
    RedirectUris =
    {
        Output.Format($"https://{serverAppService.DefaultHostName}/swagger/oauth2-redirect.html"),
        "https://localhost:5001/swagger/oauth2-redirect.html"
    }
}
We added two redirect URLs here - one for the actual production Azure App Service web app (so that we can try our Swagger UI in Azure), and our one from local Visual Studio development.
In order to assign roles for our App Registration, we'll need to assign a Service Principal to our App Registration as well:
var serverServicePrincipal =
    new AzureAD.ServicePrincipal($"{prefix}-{AppName}-service-principal",
        new AzureAD.ServicePrincipalArgs
        {
            ApplicationId = serverApplication.ApplicationId,
        });
Finally, when we run our application through Visual Studio, we'll need to pre-authorize Visual Studio to call our API:
var visualStudio =
    new AzureAD.ApplicationPreAuthorized(
        $"{prefix}-{AppName}-preauth-visualstudio",
        new AzureAD.ApplicationPreAuthorizedArgs
        {
            // This is the """well-known""" client ID for Visual Studio
            AuthorizedAppId = "872cd9fa-d31f-45e0-9eab-6e460a02d1f1",
            ApplicationObjectId = serverApplication.ObjectId,
            PermissionIds =
            {
                localDevScopeUuid.Result
            }
        });
With the above, we're telling Azure AD that the Visual Studio client ID (magic GUID above) can request the LocalDev scope.
Now that our App Registration has the LocalDev scope available for use, we still want those roles, but the user that assigned those roles is my personal Azure AD account. App roles can be assigned to:
- Managed identities
- Users
- Groups of users
To make my life easier, I'll use the group option since I can then manage the group membership rather than assigning each individual user every app role:
var config = new Config();

var jimmyUpn = config.Require("jimmy-upn");

var jimmyUser = Output.Create(
    AzureAD.GetUser.InvokeAsync(new AzureAD.GetUserArgs
{
    UserPrincipalName = jimmyUpn
}));
var devGroup = new AzureAD.Group($"{prefix}-{LocalDevGroupName}", new AzureAD.GroupArgs
{
    DisplayName = "Azure AD Example Local Dev",
    SecurityEnabled = true
});
var jimmyDevGroupMember = new AzureAD.GroupMember($"{prefix}-jimmy-{LocalDevGroupName}-member",
    new AzureAD.GroupMemberArgs
    {
        GroupObjectId = devGroup.ObjectId,
        MemberObjectId = jimmyUser.Apply(jimmy => jimmy.ObjectId)
    });

LocalDevGroupObjectId = devGroup.ObjectId;
First, I'll query Azure AD for my user. Next, I'll create the "LocalDev" Azure AD group, setting the SecurityEnabled flag to make sure I can assign roles and permissions to the group.
Finally, I'll create the group membership assigning my Azure AD user to the LocalDev group. Typically, this isn't done with infrastructure as code, instead with a service ticket in most organizations I've worked with.
Now that I've created my Azure AD group, I can go back to our server App Registration resource and assign those roles to the group:
public void AssignRoles(string prefix, AzureAdResources azureAdResources)
{
    AssignRead(prefix,
        AzureAdResources.LocalDevGroupName,
        azureAdResources.LocalDevGroupObjectId);
    AssignWrite(prefix,
        AzureAdResources.LocalDevGroupName,
        azureAdResources.LocalDevGroupObjectId);
}
The AssignRead and AssignWrite methods assign those two roles to the principal IDs pased in:
private AzureAD.AppRoleAssignment AssignRead(string prefix,
    string assigneeName,
    Output<string> principalObjectId)
{
    return new AzureAD.AppRoleAssignment(
        $"{prefix}-{assigneeName}-{AppName}-todo-read-role-assignment",
        new AzureAD.AppRoleAssignmentArgs
        {
            AppRoleId = TodoReadRoleUuid,
            PrincipalObjectId = principalObjectId,
            ResourceObjectId = ServicePrincipalObjectId
        });
}

private AzureAD.AppRoleAssignment AssignWrite(string prefix,
    string assigneeName,
    Output<string> principalObjectId)
{
    return new AzureAD.AppRoleAssignment(
        $"{prefix}-{assigneeName}-{AppName}-todo-write-role-assignment",
        new AzureAD.AppRoleAssignmentArgs
        {
            AppRoleId = TodoWriteRoleUuid,
            PrincipalObjectId = principalObjectId,
            ResourceObjectId = ServicePrincipalObjectId
        });
}
The important pieces of the AppRoleAssignment are:
- What principal we're assigning
- What role we're assigning
- That belongs to what security principal
Roles are scoped under a resource so we have to supply both the role and service principal for our App Registration.
After another pulumi up, we can configure our Swagger UI to use these scopes and get a token with our roles.
Configuring Swashbuckle
Swashbuckle supports all sorts of OAuth flows to test, so I just need to fill in the correct values for the OAuth flow:
builder.Services.AddSwaggerGen(options =>
{
    options.SwaggerDoc("v1", new OpenApiInfo { Title = "Server", Version = "v1" });

    options.OperationFilter<SwaggerAuthorizeOperationFilter>();

    var tenantId = builder.Configuration["AzureAd:TenantId"];
    options.AddSecurityDefinition("OAuth Auth Code", new OpenApiSecurityScheme
    {
        Type = SecuritySchemeType.OAuth2,
        Flows = new OpenApiOAuthFlows
        {
            AuthorizationCode = new OpenApiOAuthFlow
            {
                AuthorizationUrl = new Uri($"https://login.microsoftonline.com/{tenantId}/oauth2/v2.0/authorize"),
                TokenUrl = new Uri($"https://login.microsoftonline.com/{tenantId}/oauth2/v2.0/token"),
                Scopes = new Dictionary<string, string>
                {
                    {"api://azure-ad-example-server/LocalDev", "Azure Server Web API"}
                }
            }
        }
    });
})
Besides the Authorization and Token URLs (that get their Tenant ID from my Azure AD tenant), and the scope I'll request is in the format {API URI}/{scope}. That URI is what I configured as my "Identifier URI" in the App Registration resource:
var serverApplication = new AzureAD.Application($"{prefix}-{AppName}", new AzureAD.ApplicationArgs
{
    DisplayName = "Azure AD Example Server",
    IdentifierUris =
    {
        $"api://{prefix}-{AppName}"
    },
Whew! Finally, I need to configure Swashbuckle to use this OAuth middleware:
app.UseSwagger();
app.UseSwaggerUI(options =>
{
    options.SwaggerEndpoint("/swagger/v1/swagger.json", "Server v1");
    options.OAuthClientId(builder.Configuration["AzureAd:ClientId"]);
    options.OAuthScopeSeparator(" ");
    options.OAuthUsePkce();
});
With all of this in place, when I run the app, I'll get a lovely Swagger UI:
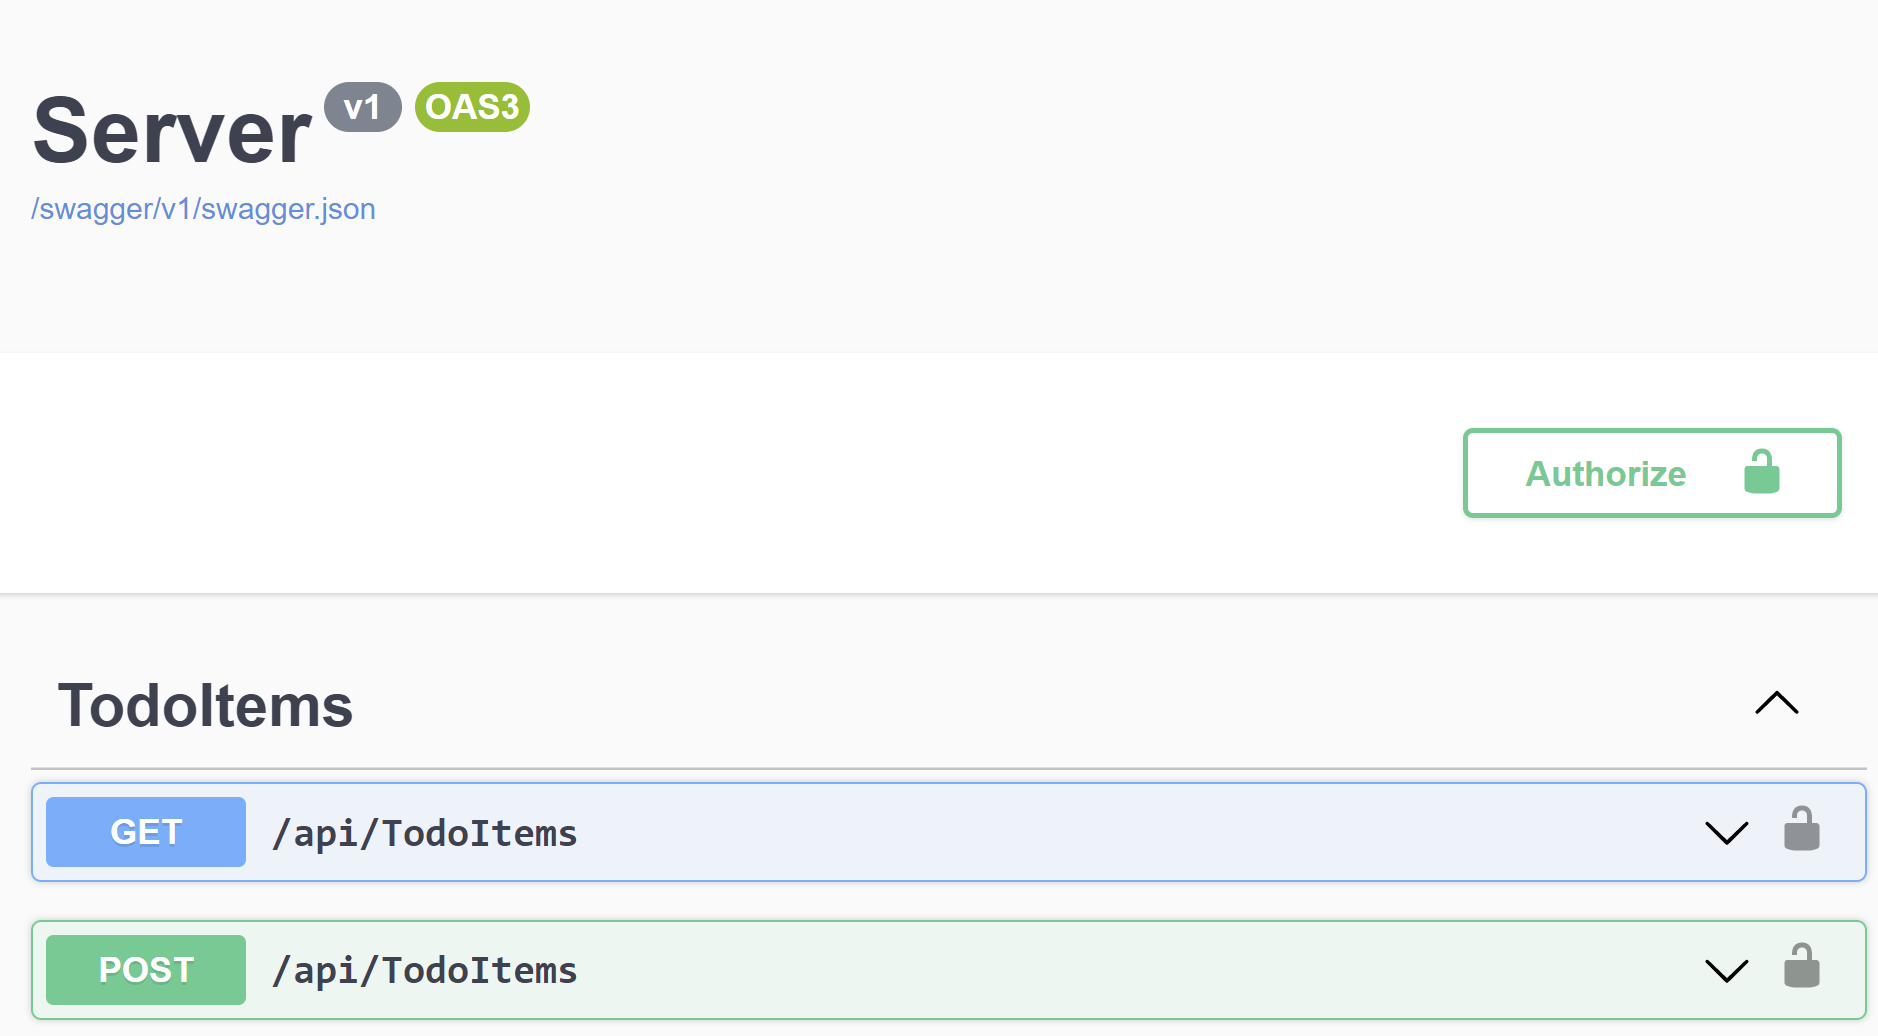
With an "Authorize" button and a little padlock. When I click that button, I can kick off the Azure AD flow:

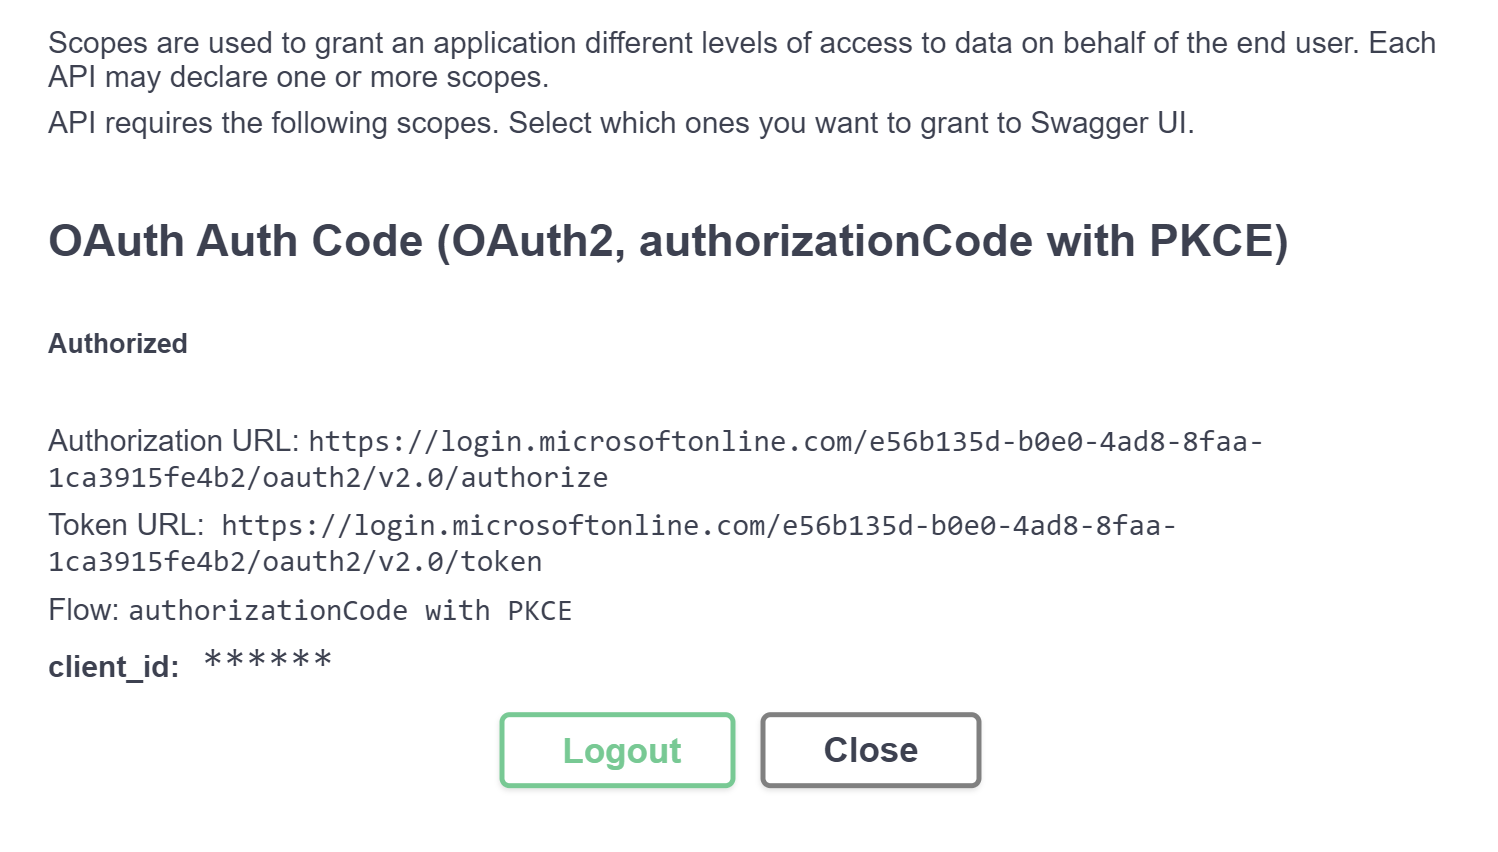
Clicking "Authorize" here will launch a new tab to have me log in to Azure AD (Microsoft Online, whatever) and now I'll have a token to make requests:
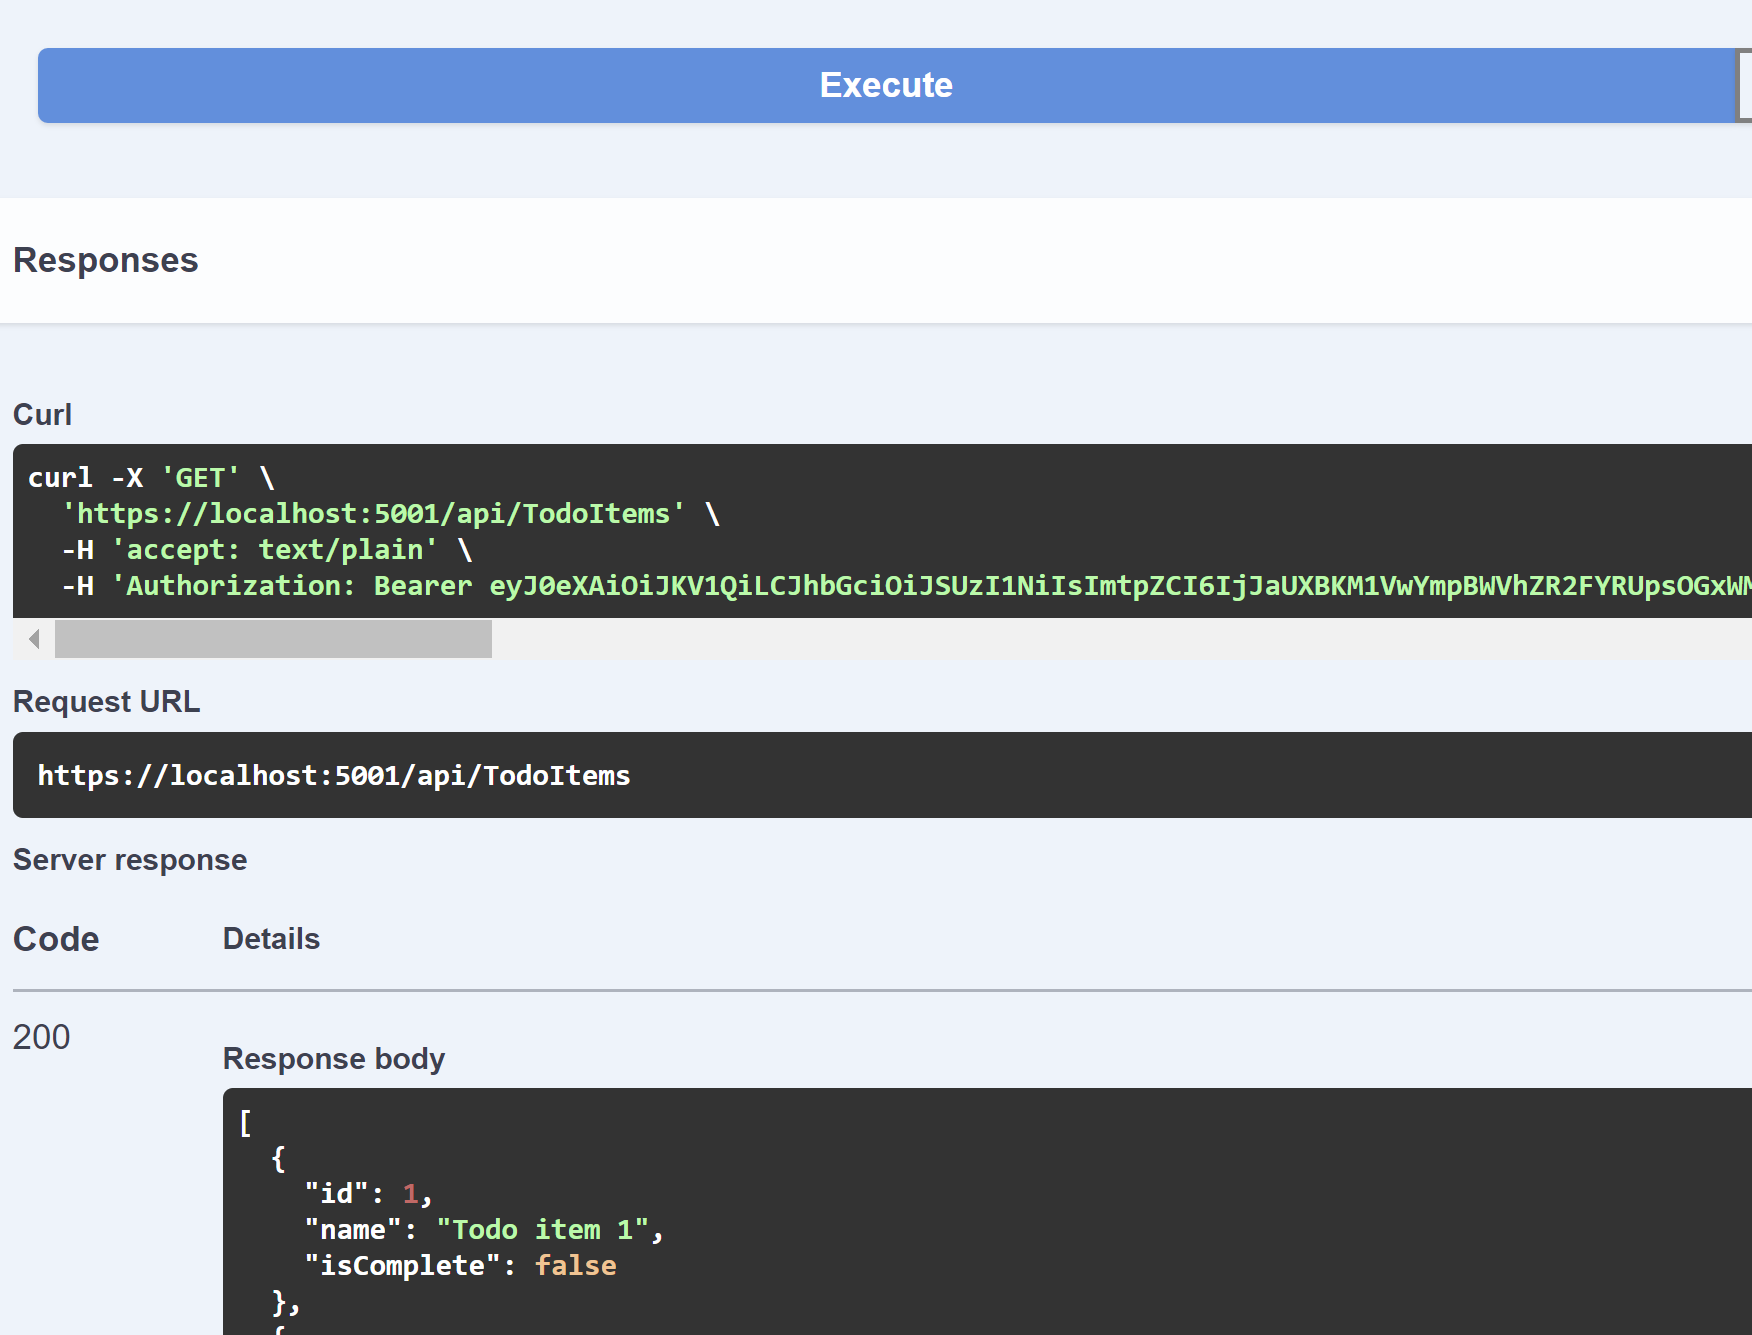
Now trying out one of the API endpoints, I'll have that valid token and I'll get a 200 OK response:
If I look at my JWT, I'll see not only the scp value with the LocalDev scope, but in my token are the roles claim for the roles I assigned to my group:
{
  "aud": "f12ec5af-617f-4363-bcc6-e23bc9e813dd",
  "iss": "https://login.microsoftonline.com/e56b135d-b0e0-4ad8-8faa-1ca3915fe4b2/v2.0",
  "iat": 1660070958,
  "nbf": 1660070958,
  "exp": 1660076088,
  "aio": "AaQAW/8TAAAAOVpyXGfqzMBdCQgfoF/q2srt9CCanjmfsxycdyTYLtHjUuGNnCI+ictdnA4vEruNTJPIq8ADmiYRJHOdxrQzM2HB1P4o3yeTwhk1khJMmUI0PECUaFOVriFAabt3s0w+uhKBsxRyRauhrIxfHHnjfPaLS1dLpjqS+/PJ9J7QkL6fV8Gm+bxTnfAuTneRyBYW/RciBcuuNkTLgnkkHPkw5w==",
  "azp": "f12ec5af-617f-4363-bcc6-e23bc9e813dd",
  "azpacr": "0",
  "idp": "live.com",
  "name": "James Bogard",
  "oid": "c95ff74e-b892-4aae-a551-2984a786d506",
  "preferred_username": "jimmy.bogard@gmail.com",
  "rh": "0.AQ4AXRNr5eCw2EqPqhyjkV_ksq_FLvF_YWNDvMbiO8noE90OANw.",
  "roles": [
    "Todo.Write",
    "Todo.Read"
  ],
  "scp": "LocalDev",
  "sub": "5Dz6NO8oJNOzX8giuSl6qrKMkVEWkW49woUOSVnx8PA",
  "tid": "e56b135d-b0e0-4ad8-8faa-1ca3915fe4b2",
  "uti": "cX8KRT5CS0uZizBauckoAA",
  "ver": "2.0"
}
With all these pieces in place (scopes, roles, assignments), I can call my server API protected with role-based access control via application permissions.
I'll likely only make these role assignments to this Local Dev group in lower environments, or perhaps only admins. In any case, I don't have to turn security off to be able to develop locally.
Now that we've got our server defined and testable locally, in the next post I'll look at creating our "external" client that will use a Client ID/Secret to call our API.