
Securing Web APIs with Azure AD: Connecting Azure Clients

Posts in this series:
- A Case Study
- Designing Authentication Schemes
- Authorizing Client Applications
- Building the Server
- Enabling Local Development
- Connecting External Clients
- Connecting Azure Clients
In the last post, we used OAuth 2.0 Client Credentials flow to connect an external client (modeling our on-prem scenario). We can use that same approach for the internal Azure traffic, creating app registrations and creating client secrets. But there's an easier approach to securing Azure resources when we're inside the Azure walled garden - Managed Identities.
A common challenge for developers is the management of secrets, credentials, certificates, and keys used to secure communication between services. Managed identities eliminate the need for developers to manage these credentials.
Managed identities are a core feature of Azure, allowing us to assign Azure AD principals access to various resources, and assign that Managed Identity to our application. A "user-assigned" managed identity can have a longer lifecycle and be assigned to multiple applications. In a typical microservice scenario, we scope our managed identities to the microservice. All applications (APIs, web apps, message endpoints, etc.) are assigned that managed identity.
We then apply permissions to other microservice-owned resources (databases, service bus, Key Vault) so that only that microservice can access its resources, and no others.
Creating the Azure Client Resources
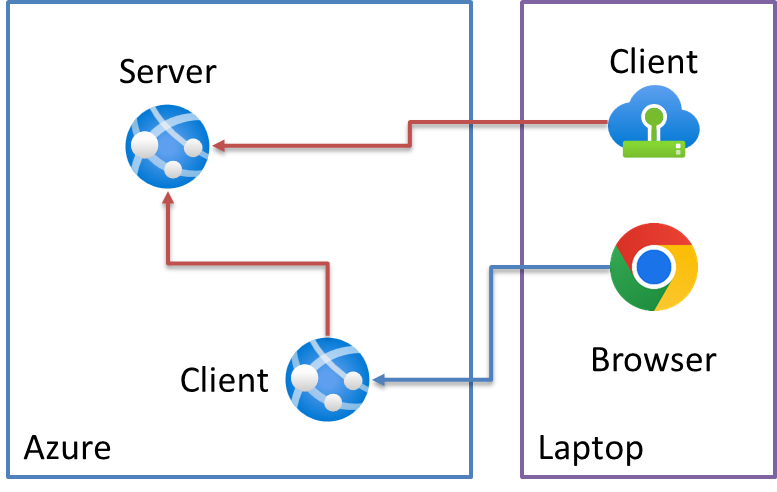
First up, we need to create our Azure Client. I'm deploying the client as an Azure App Service, modeling it as our "BFF" in which the Azure Client exposes the same APIs but authenticates with Azure AD underneath the covers:
We'll start with a basic App Service definition:
var webApp = new AzureNative.Web.WebApp($"{prefix}-{AppName}",
    new AzureNative.Web.WebAppArgs
    {
        Kind = "app,linux",
        Location = resourceGroup.Location,
        ResourceGroupName = resourceGroup.Name,
        ServerFarmId = appServicePlan.Id,
        Enabled = true,
        HttpsOnly = true,
        SiteConfig = new AzureNative.Web.Inputs.SiteConfigArgs
        {
            LinuxFxVersion = "DOTNETCORE|6.0",
            AppCommandLine = "dotnet AzureClient.dll",
            AppSettings = new[]
            {
                new AzureNative.Web.Inputs.NameValuePairArgs
                {
                    Name = "Server__BaseAddress",
                    Value = Output.Format($"https://{server.AppServiceDefaultHostName}")
                }
            }
        },
    });
We need to configure the application client with the server's address, so I'm using a Pulumi output to feed the value from our server App Service we created earlier.
Next, we need to create our User Assigned Identity:
var userAssignedIdentity = new AzureNative.ManagedIdentity.UserAssignedIdentity(
    $"{prefix}-{AppName}-user",
    new AzureNative.ManagedIdentity.UserAssignedIdentityArgs
    {
        ResourceGroupName = resourceGroup.Name
    });
And assign this identity to our App Service:
var webApp = new AzureNative.Web.WebApp($"{prefix}-{AppName}",
    new AzureNative.Web.WebAppArgs
    {
        /* all the previous junk above */
        Identity = new AzureNative.Web.Inputs.ManagedServiceIdentityArgs
        {
            Type = AzureNative.Web.ManagedServiceIdentityType.UserAssigned,
            UserAssignedIdentities = userAssignedIdentity.Id.Apply(id =>
            {
                var im = new Dictionary<string, object>
                {
                    {id, new Dictionary<string, object>()}
                };
                return im;
            })
        }
    });
That's it for our App Service. When the app runs in Azure, it will use that identity:

Now that we've got our App Service with its managed identity, we need to assign the App Roles to that managed identity. Back on our Server Pulumi resource:
public void AssignRoles(string prefix, Client client)
{
    AssignRead(prefix, Client.AppName,
        client.UserAssignedIdentityPrincipalId);
    AssignWrite(prefix, Client.AppName,
        client.UserAssignedIdentityPrincipalId);
}
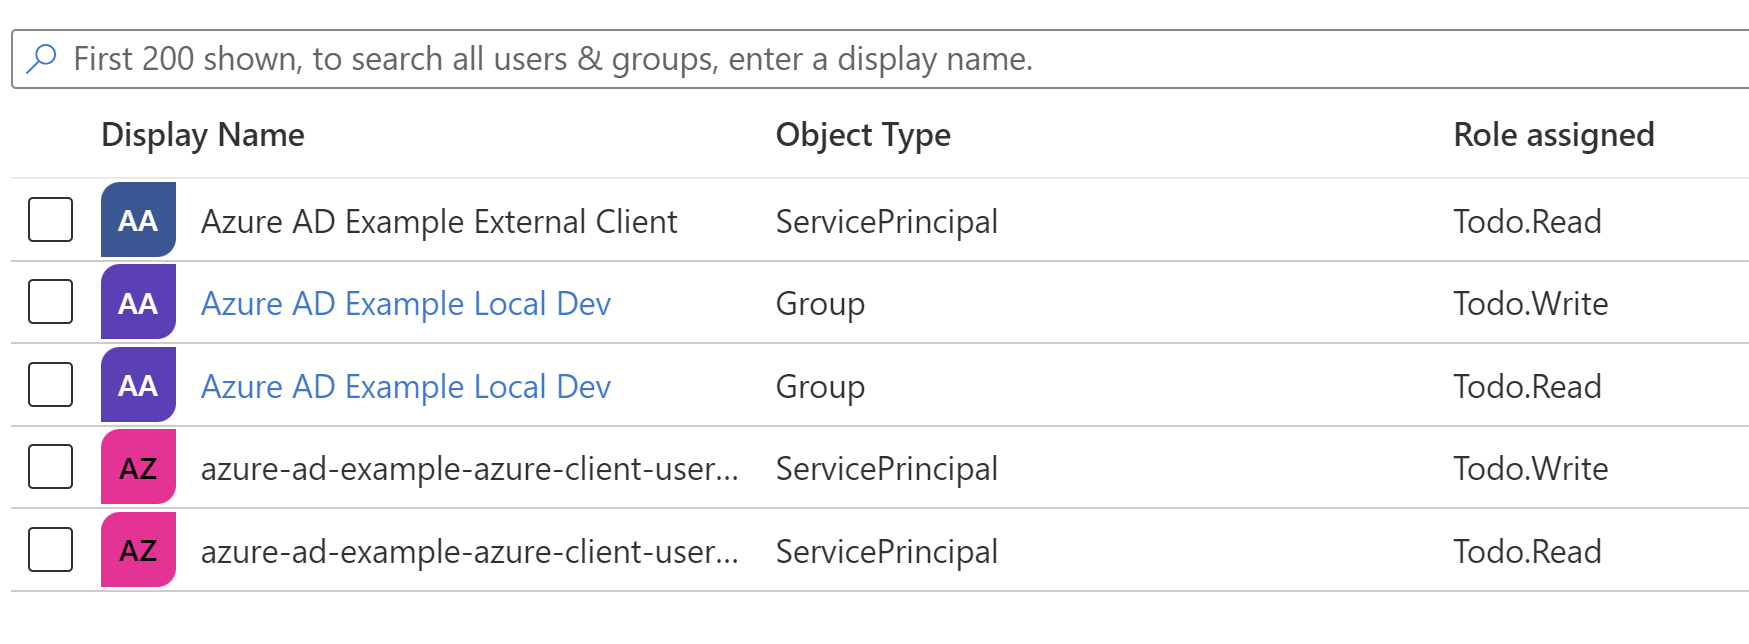
We'll assign the Todo.Read and Todo.Write roles (permissions) to the User Assigned Identity's Principal ID. Running this with Pulumi, we now see the full set of permissions assigned:
Now that we've got our Azure resources created, we need to modify our Client application to acquire a token via the managed identity.
Calling the API using Managed Identities
Previously, we used the MSAL.NET libraries to acquire tokens. When we pull Managed Identities into the mix, we'll need to switch libraries to Azure.Identity:
The Azure Identity library provides Azure Active Directory token authentication support across the Azure SDK. It provides a set of TokenCredential implementations which can be used to construct Azure SDK clients which support AAD token authentication.
Azure.Identity uses MSAL.NET underneath the covers but provides a more seamless experience when using various Azure resources. Things like Azure SQL, Cosmos DB, Key Vault, all expose SDKs that use Azure.Identity to acquire tokens underneath the covers. Since there are a variety of mechanisms to authenticate, including Managed Identity, Azure.Identity includes a chained TokenCredential:

When we're inside of Azure, it will use the Environment or Managed Identity credentials. Locally, it'll use Visual Studio (when we've logged into Azure from the options). After adding the package to our client:
<PackageReference Include="Azure.Identity" Version="1.7.0" />We then configure this TokenCredential in our container:
var managedIdentityClientId = Configuration["ClientId"];
var tenantId = Configuration["TenantId"];
var options = new DefaultAzureCredentialOptions
{
    ManagedIdentityClientId = managedIdentityClientId,
    VisualStudioTenantId = tenantId
};

services.AddSingleton<TokenCredential>(new DefaultAzureCredential(options));
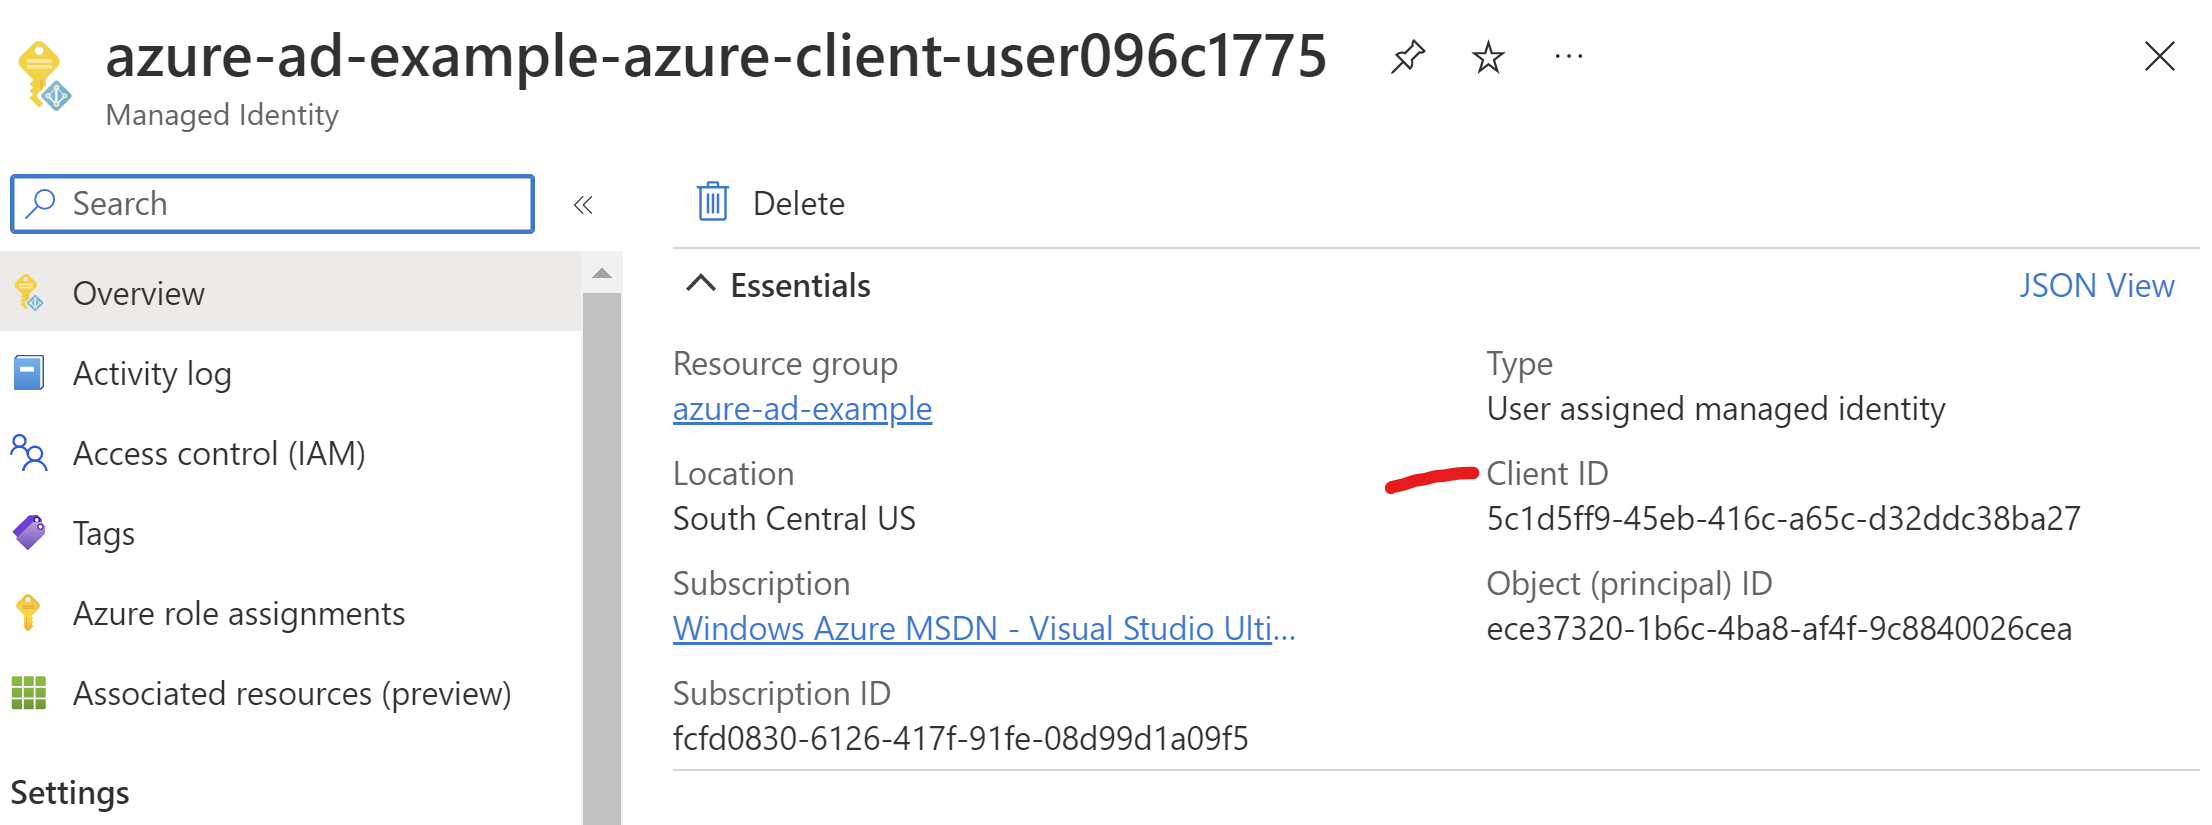
We give it the ManagedIdentityClientId from configuration, and this value comes out of our Pulumi outputs:
Now we need to use that TokenCredential to acquire token. We'll take an identical approach to external clients, creating middleware for our typed HttpClient:
public class AzureIdentityAuthHandler<TClient> : DelegatingHandler
{
    private readonly TokenCredential _credential;
    private readonly ILogger<AzureIdentityAuthHandler<TClient>> _logger;
    private readonly AzureAdServerApiOptions<TClient> _options;

    public AzureIdentityAuthHandler(TokenCredential credential,
        ILogger<AzureIdentityAuthHandler<TClient>> logger,
        IOptions<AzureAdServerApiOptions<TClient>> options)
    {
        _credential = credential;
        _logger = logger;
        _options = options.Value;
    }
The DelegatingHandler takes in our TokenCredential as a dependency, as well as the AzureAdServerApiOptions (reused from our previous external client example). We'll then override the SendAsync method:
protected override async Task<HttpResponseMessage> SendAsync(
    HttpRequestMessage request,
    CancellationToken cancellationToken)
{
    var scopes = new[] { _options.ApplicationId + "/.default" };
    var tokenRequestContext = new TokenRequestContext(scopes);
    var result = await _credential.GetTokenAsync(
        tokenRequestContext, cancellationToken);

    _logger.LogInformation(result.Token);

    request.Headers.Authorization = new AuthenticationHeaderValue("Bearer", result.Token);

    return await base.SendAsync(request, cancellationToken);
}
Unlike our external client example, we don't supply a client secret, only the client ID. This client secret does exist, but only when running inside of Azure. Otherwise, it's still using the OAuth 2.0 Client Credentials flow to acquire a token. This secret is managed transparently to our application, we just need to provide the client ID.
Next, our typed HttpClient registration:
services.AddTransient(typeof(AzureIdentityAuthHandler<>));

var serverConfigSection = Configuration.GetSection("Server");

services.Configure<AzureAdServerApiOptions<IWeatherForecastClient>>(serverConfigSection);
services.AddHttpClient<IWeatherForecastClient, WeatherForecastClient>()
    .ConfigureHttpClient((sp, client) =>
    {
        var serverOptions = sp.GetRequiredService<
            IOptions<AzureAdServerApiOptions<IWeatherForecastClient>>>();
        client.BaseAddress = new Uri(serverOptions.Value.BaseAddress);
    })
    .AddHttpMessageHandler<AzureIdentityAuthHandler<IWeatherForecastClient>>();

services.Configure<AzureAdServerApiOptions<ITodoItemsClient>>(serverConfigSection);
services.AddHttpClient<ITodoItemsClient, TodoItemsClient>()
    .ConfigureHttpClient((sp, client) =>
    {
        var serverOptions = sp.GetRequiredService<
            IOptions<AzureAdServerApiOptions<ITodoItemsClient>>>();
        client.BaseAddress = new Uri(serverOptions.Value.BaseAddress);
    })
    .AddHttpMessageHandler<AzureIdentityAuthHandler<ITodoItemsClient>>();
And register each client with the appropriate middleware. Then in our code that uses the client, you won't see any mucking around of authorization:
[Route("api/[controller]")]
[ApiController]
public class TodoItemsController : ControllerBase
{
    private readonly ITodoItemsClient _client;

    public TodoItemsController(ITodoItemsClient client)
    {
        _client = client;
    }

    [HttpGet]
    public async Task<IEnumerable<TodoItem>?> GetTodoItems()
    {
        return await _client.GetAsync();
    }

    [HttpGet("{id}")]
    public async Task<TodoItem?> GetTodoItem(long id)
    {
        return await _client.GetAsync(id);
    }
When we run locally, our JWT represents acquiring our token via the Visual Studio login:
{
  "typ": "JWT",
  "alg": "RS256",
  "kid": "2ZQpJ3UpbjAYXYGaXEJl8lV0TOI"
}.{
  "aud": "f12ec5af-617f-4363-bcc6-e23bc9e813dd",
  "iss": "https://login.microsoftonline.com/e56b135d-b0e0-4ad8-8faa-1ca3915fe4b2/v2.0",
  "iat": 1664458501,
  "nbf": 1664458501,
  "exp": 1664463160,
  "azp": "872cd9fa-d31f-45e0-9eab-6e460a02d1f1",
  "azpacr": "0",
  "idp": "live.com",
  "name": "James Bogard",
  "oid": "c95ff74e-b892-4aae-a551-2984a786d506",
  "roles": [
    "Todo.Write",
    "Todo.Read"
  ],
  "scp": "LocalDev",
  "sub": "5Dz6NO8oJNOzX8giuSl6qrKMkVEWkW49woUOSVnx8PA",
  "tid": "e56b135d-b0e0-4ad8-8faa-1ca3915fe4b2",
  "uti": "xz7O-0rskE6oOxlt_pkOAA",
  "ver": "2.0"
}.[Signature]
I removed some values for brevity, but we can see that the roles claim is there because I previously assigned that LocalDev group the roles and added myself as a group member. When we run this in Azure, the claim will match the Managed Identity requestor:
{
  "typ": "JWT",
  "alg": "RS256",
  "kid": "2ZQpJ3UpbjAYXYGaXEJl8lV0TOI"
}.{
  "aud": "f12ec5af-617f-4363-bcc6-e23bc9e813dd",
  "iss": "https://login.microsoftonline.com/e56b135d-b0e0-4ad8-8faa-1ca3915fe4b2/v2.0",
  "iat": 1664458729,
  "nbf": 1664458729,
  "exp": 1664545429,
  "aio": "E2ZgYEh/qrljofFz6w3LExNl1XR+AQA=",
  "azp": "5c1d5ff9-45eb-416c-a65c-d32ddc38ba27",
  "azpacr": "2",
  "oid": "ece37320-1b6c-4ba8-af4f-9c8840026cea",
  "rh": "0.AQ4AXRNr5eCw2EqPqhyjkV_ksq_FLvF_YWNDvMbiO8noE90OAAA.",
  "roles": [
    "Todo.Write",
    "Todo.Read"
  ],
  "sub": "ece37320-1b6c-4ba8-af4f-9c8840026cea",
  "tid": "e56b135d-b0e0-4ad8-8faa-1ca3915fe4b2",
  "uti": "p81ssIMZSk-EA7bhyft_AA",
  "ver": "2.0"
}.[Signature]
We now see that the issuer is Azure AD (instead of live.com), the audience is the server's Application ID and the subject is the client Managed Identity's principal ID, and the roles claim contains the roles we assigned.
With that, our system is complete! We've got OAuth 2.0 Client Credentials flows enabled via Azure AD, and leveraged the simplicity of Managed Identities to manage those secrets transparently.