
Securing Web APIs with Azure AD: Building the Server

Posts in this series:
- A Case Study
- Designing Authentication Schemes
- Authorizing Client Applications
- Building the Server
- Enabling Local Development
- Connecting External Clients
- Connecting Azure Clients
In the last couple of posts, we looked at authentication and authorization options and picked some strategies for each. With those pieces chosen, we can now set about building our server and client applications as well as the Azure resources for each, starting with the Server.
Creating the Server API Application
But first things first, we'll need an actual API to secure! For this, Microsoft has a TON of different dotnet templates targeting the various Microsoft Identity options. The Microsoft.Identity.Web package leverages Microsoft Authentication Library for .NET (MSAL) packages underneath the covers. Our server is a "protected web API", meaning it's going to use Azure AD to perform authentication and authorization.
Creating it is fairly straightforward, we can use dotnet new webapi -auth SingleOrg, but I've got an existing API to secure so I'll just add a package reference to Microsoft.Identity.Web. Next, I'll need to configure authentication:
builder.Services
    .AddMicrosoftIdentityWebApiAuthentication(builder.Configuration);
This shortcuts a few configuration options like the bearer scheme and will look for a configuration section called AzureAd for its configuration.
Finally, I need to turn on authentication and authorization middleware (if it's not already there):
app.UseAuthentication();
app.UseAuthorization();
Now in my API controller, I can turn authorization:
[Route("api/[controller]")]
[ApiController]
[Authorize]
public class TodoItemsController : ControllerBase
My configuration isn't correct however, as I need to create the Azure resources necessary to authorize incoming requests.
Building the Server Azure Resources
For this, I'll be following the docs on creating a protected web API in the Azure AD docs. In order for my server API to perform authorization, it needs to identify itself as some sort of protected application. In Azure AD, these are known as "application objects" or "app registrations". Application objects are simply a central definition of all the security settings for an application that uses Azure AD. In addition to an application object is an optional "service principal" which, from the docs:
are what govern an application connecting to Azure AD and can be considered the instance of the application in your directory
When we want to create rules for what applications get what roles, we do those through the service principals. A single web API is represented by a single application object (there are similar concepts in other identity providers like Auth0 and Okta).
To create my application object, I'll use Pulumi to create an Application, and from that, I'll get my App Registration's ClientId:
var serverApplication = new AzureAD.Application($"{prefix}-{AppName}", new AzureAD.ApplicationArgs
{
    DisplayName = "Azure AD Example Server",
    IdentifierUris =
    {
        $"api://{prefix}-{AppName}"
    },
    Api = new AzureAD.Inputs.ApplicationApiArgs
    {
        RequestedAccessTokenVersion = 2,
    }
});

ApplicationApplicationId = serverApplication.ApplicationId;
Where ApplicationApplicationId is a Pulumi output. Running pulumi up gets me my application's Client ID (I could go to the portal for this, but how boring!), and I can put this in to my server web API's configuration, along with the appropriate tenant ID:
"AzureAd": {
  "Instance": "https://login.microsoftonline.com/",
  "TenantId": "e56b135d-b0e0-4ad8-8faa-1ca3915fe4b2",
  "ClientId": "f12ec5af-617f-4363-bcc6-e23bc9e813dd"
},
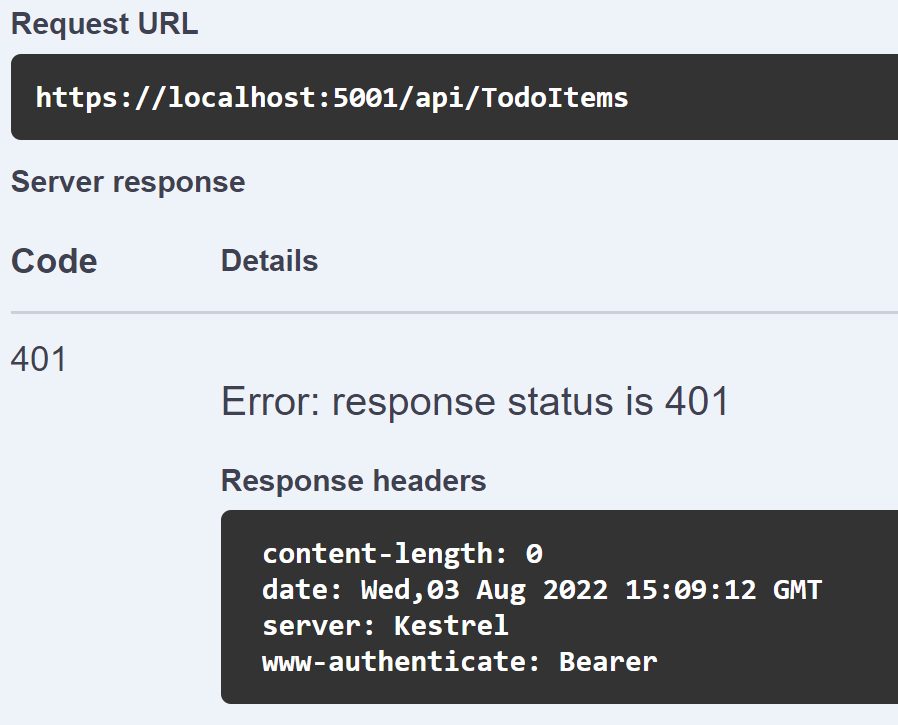
With this in place, I can run my web API locally and validate that I can't call the application without a valid JWT:
Now that we've secured our server API, we need to add role-based authorization.
Adding and configuring RBAC
To layer on role-based access control through application permissions, I'll need to do a few things:
- Define the roles in Azure AD
- Enforce the roles in my application
Defining the roles is fairly straightforward HOWEVER there is one sort of strange thing that I need to define IDs for each role so that they can be referenced later. For this, I'll use the Pulumi RandomUuid object for the Read/Write IDs:
var todoReadRoleUuid = new Pulumi.Random.RandomUuid($"{prefix}-{AppName}-todo-read-role-id");
var todoWriteRoleUuid = new Pulumi.Random.RandomUuid($"{prefix}-{AppName}-todo-write-role-id");
Then I'll add the AppRoles section in my Application registration:
AppRoles =
{
    new AzureAD.Inputs.ApplicationAppRoleArgs
    {
        AllowedMemberTypes =
        {
            "Application"
        },
        DisplayName = "Todo.Read",
        Enabled = true,
        Value = "Todo.Read",
        Description = "Todo.Read",
        Id = todoReadRoleUuid.Result
    },
    new AzureAD.Inputs.ApplicationAppRoleArgs
    {
        AllowedMemberTypes =
        {
            "Application"
        },
        DisplayName = "Todo.Write",
        Enabled = true,
        Value = "Todo.Write",
        Description = "Todo.Write",
        Id = todoWriteRoleUuid.Result
    }
},
With this configuration, I allow applications to be assigned each of these roles and set up some sensible defaults for the name/value/descriptions. After running pulumi up again, I've got the roles defined in my App Registration and I'm ready to enforce these permissions in my web API.
ASP.NET Core offers several different ways of authorizing roles in my API, but the simplest is to use the Authorize attribute:
[Route("api/[controller]")]
[ApiController]
[Authorize]
public class TodoItemsController : ControllerBase
{
    [HttpGet]
    [Authorize(Roles="Todo.Read")]
    public async Task<ActionResult<IEnumerable<TodoItem>>> GetTodoItems()
    { ... }

    [HttpGet("{id}")]
    [Authorize(Roles="Todo.Read")]
    public async Task<ActionResult<TodoItem>> GetTodoItem(long id)
    { ... }

    [HttpPut("{id}")]
    [Authorize(Roles="Todo.Write")]
    public async Task<IActionResult> PutTodoItem(long id, TodoItem todoItem)
    { ... }

    [HttpPost]
    [Authorize(Roles="Todo.Write")]
    public async Task<ActionResult<TodoItem>> PostTodoItem(TodoItem todoItem)
    { ... }

    [HttpDelete("{id}")]
    [Authorize(Roles="Todo.Write")]
    public async Task<IActionResult> DeleteTodoItem(long id)
    { ... }
The final piece of the puzzle is that by default, the inbound claim mapping for "roles" to the ASP.NET Core Identity's "Roles" is some wonky mapping based on some legacy Azure AD token. We want to re-map that because with the V2 token of Azure AD, the roles come across in a roles claim. This is easily done in our configuration by adding the RoleClaimType value of roles:
{
  "AzureAd": {
    "Instance": "https://login.microsoftonline.com/",
    "TenantId": "e56b135d-b0e0-4ad8-8faa-1ca3915fe4b2",
    "ClientId": "f12ec5af-617f-4363-bcc6-e23bc9e813dd",
    "TokenValidationParameters": {
      "RoleClaimType": "roles"
    }
  },
Now inbound tokens with Microsoft.Identity.Web and configuration options above will be:
- Validated against an issuer of
{Instance}/{TenantId}/v2.0 - Validated against an audience of
{ClientId} - Map the inbound
rolesclaim into the ASP.NET Core Identity's roles
With all these in place, my application is now ready to be called with a properly authenticated client. However, I still need to authorize specific security principals against my server by assigning these application roles. In the next post, we'll do this first with my Azure AD user to enable local development.